
In this homework, you'll be completing a basic photo manipulation program in Java!

We've given you the GUI for this program and have defined a number of super-fancy photo effects, controlled by buttons on the right-side of the application ("1890s", "Pin Hole", etc.). However, these effects don't quite work yet. They depend on basic photo manipulation algorithms that you must implement. (These basic manipulations are controlled by the buttons on the left-side, provided for your testing convenience.)
We've given you a few completed files to get started:
- PixelPicture.java, which manages the reading and writing of image data
- GUI.java, the simple GUI for the program (which you can run to help you test Parts 3 and 4)
- ColorMap.java, a Map data structure that helps build histograms
- ManipulateTest.java, a JUnit test file for the image manipulations.
- PointQueue.java, a data structure for managing queues of ints. (Needed only for the Kudos flood fill problem.)
And you'll have to finish off a few more:
- Pixel.java, which is a point of color in an image. You'll have to finish a few constructors (Pixel()), getRed(), getGreen(), getBlue(), getComponents(), distance(), toString() and equals()
- MyPixelTest.java, which contains an exmample test for Pixel. You will need to add your own tests, which will be graded manually.
- SimpleManipulations.java, a collection of simpler image manipulations. You'll have to finish rotateCCW(), border(), invertColors(), grayScaleAverage(), scaleColors(), and alphaBlend().
- AdvancedManipulations.java, a collection of image manipulations requiring pre-processing of the image or consideration of multiple pixels at once in order to paint a single pixel. You'll have to finish adjustContrast(), reducePalette(), and blur(), (and flood() for Kudos!).
- Effects.java, which implements super-fancy photo effects, based on the basic image manipulations. (Modified only for Kudos.)
- MyTest.java, a place to put your own JUnit tests.
You can download all the code files here, and import them into a java project. You can download the test images used in MyTest.java here.
We recommend using a second workspace for the Java projects. Create a new workspace by using the "File > Switch Workspace" option. (If you don't want to create a second workspace, don't forget to switch your Eclipse workspace to Java mode!)
Don't forget to add JUnit 4 to your libraries!
The JavaDocs for the classes you are working with can be found here.
Task 1: Pixels
Your first task is to complete the Pixel class. A pixel represents a color and is comprised by three ints, indicating the amount of red, green, and blue with values ranging from 0 to 255. Lower values mean less color; higher values mean more.
We are going to model 8-bit RGB pixels. They are 8-bit pixels because 28 = 256, and each component of the pixel can assume 256 different values. They are RGB pixels because the colors are stored in that order: red, green, blue.
To start off, you will need to think of how to store the red, green and blue values associated with each Pixel Object. Keep in mind that every new Pixel created will need to store its own red, green and blue values. In addition, we want to make Pixels immutable. That is, once we create a new Pixel, there should be no way to modify its RGB values.
Once you decide how to store the different values, complete the two different constructors. In order to create a new Pixel, one of its constructors must be called. If two objects have been created, they store their instance variables separately. So new Pixel(255,255,255) represents white, new Pixel(0,0,0) is black, and new Pixel(0,255,0) represents green. If a is an array containing the values {0, 0, 255} then new Pixel(a) constructs a blue pixel.
After finishing the constructors, complete the following methods:
- public int getRed()
- public int getGreen()
- public int getBlue()
- public int[] getComponents()
- public int distance(Pixel px)
- public String toString()
- public boolean equals(Pixel other)
Once again: make sure that encapsulation holds and that you can't modify the instance variables unless calling class methods. This means that if a client modifies an array element obtained through getComponents, the Pixel value should not change.
Pixel Testing
In MyPixelTest.java, write test cases for the Pixel class. The TAs will be manually assigning a grade for these, checking to see that you have included at least one test case for each function you wrote.
Pictures
This homework will require you to work with bitmaps — two-dimensional arrays of color values — a standard model for images.
The PixelPicture and Pixel classes encapsulate all of the basic image management you'll need. The PixelPicture class wraps up the Java library support for image processing. You won't be working with Java's image support directly; instead, you'll process bitmaps provided by this class.
A bitmap is a two dimensional array of pixels.
In this application, bitmaps are indexed from left to right and from top to bottom.
| 0 | 1 | 2 |
| 0123 | 0123 | 0123 |
The numbers are the index in the array
In the figure to the right, each dashed box represents an array. The top-level array holds each of the columns of the image, in left-to-right order. Each column array holds the pixels of that column, in a top-to-bottom order.
This layout is convenient because it puts the origin in the top-left corner, and lets us index a bitmap in x-y order.
Java offers a variety of classes for working with a wide variety of different image formats. In order to simplify the interface, we've wrapped up the tricky bits of this code in a class called PixelPicture. The PixelPicture class makes the image data available to you via the getBitmap method, which returns a bitmap of Pixels corresponding to the PixelPicture's contents.
In general, most problems in this assignment involve taking a PixelPicture p, getting its bitmap via p.getBitmap(), manipulating the Pixels in that bitmap in some way, and then finally constructing a new PixelPicture from the manipulated bitmap using the appropriate PixelPicture constructor.
Implementing the Photo Manipulations
For the rest of the assignment, you will have to use bitmaps and Pixels to implement some photo manipulation algorithms. The algorithms you need to implement are described in detail in the sections below.
Make sure to test your functions in MyTest.java, which you can run as a JUnit test from within Eclipse. You can also run the GUI by right-clicking on GUI.java and selecting "Run As... Java Application". However, the only buttons that will work (initially) are "Load new image", "Save image", "Undo", "Quit" and "RotateCW".
The GUI downloads its initial image from the internet, so make sure that you have the internet available when you run it.
Some of the algorithms you are asked to implement during this assignment, especially those found in AdvancedManipulations.java, can be implemented in a very inefficient manner. We have timeouts in place that will fail individual tests if they take too long. If many of your tests are taking too long, we cannot accept your submission. None of the algorithms we ask you to implement should take more than a second or two to run.
Read over the whole assignment (on this webpage) before starting to code. You'll also want to read over a few of the source files first. In particular, the file Effects.java demonstrates how the basic manipulations can be used and put together to form composite effects. Reading this file will help you understand how to use the static methods in SimpleManipulations.java.
Whenever you need to use doubles in calculations: at the end of your calculations, you must round using Math.round() then cast to int. Like this
  double d = ...  /* compute a double */
  int val = (int)Math.round(d); /* convert it to an int */
Writing Tests
You can use the files MyPixelTest.java, ManipulateTest.java and MyTest.java to test your code (only MyPixelTest.java will count towards your grade. ManipulateTest.java contains a number of simple tests for the basic manipulations, MyTest.java uses all of the sample images from this page as the basis of its tests. Neither of these files are sufficient, so you should also create additional test cases to help understand, debug, and evaluate your program. For help on how to write JUnit tests for this assignment, look at the provided tests these Test files. The tests verify that your methods return the correct PixelPicture objects by comparing them to simple images constructed from small two-dimensional arrays. The diff method in the PixelPicture class is useful for checking that two PixelPicture objects have the same bitmaps.
To run the tests in MyTest.java that are based on the picture files, you will need to download the images from this zip file. Then, to run the unit tests, you'll need to modify the instance variable LOCATION to refer to the directory where you unzipped these files. Note that these tests compare your solution to ours exactly. Because of floating point imprecision, your code may fail these tests but still be correct. These tests will allow you to see how close your solution is to ours.
Finally, beware of image compression effects when comparing two images. Due to image compression, if you save as a jpg or gif, the pixels in the saved image on your hard drive will have slightly altered pixels compared to the PixelPicture object (in memory) that is returned from your manipulation methods. (In the case of gif images, this is due to palette reduction of the same flavor you will implement yourself!) Therefore, you always want to compare only saved images to our sample images.
Task 2: Rotation
Change the orientation of an image.
In SimpleManipulations.java, there are two rotation functions: rotateCW() and rotateCCW(), which rotate an image clockwise and counter-clockwise, respectively. Each function rotate the image 90° in the given direction.
We have implemented rotateCW for you, you will need to implement rotateCCW. Implementing this command will require you process bitmaps. To understand the two rotations, consider the following bitmap, where we've numbered each pixel with its coordinates:
| (0,0)(0,1)(0,2)(0,3)... | (1,0)(1,1)(1,2)(1,3)... | (2,0)(2,1)(2,2)(2,3)... | ... ... ... ... ... |
Rotating this bitmap will produce a bitmap with the following renumbered coordinates.
|
|
|||||||||||
| Clockwise rotation | Counter-clockwise rotation |
Your job is to implement this "renumbering", copying pixels from their old coordinates to their new coordinates.
For this implementation you should fill in the definition of the static method rotateCCW in SimpleManipulations.java. Do not merely call rotateCW three times though. Although that will pass the tests it will not give you the practice working with 2D arrays that you'll need for the rest of the assignment.
Task 3: Border
Create a new image that adds a border to an existing image. The next step is to implement the static method border in SimpleManipulations.java. As with rotation, this operation is performed by renumbering---copying pixels from their old locations to new coordinates. However, this time the new image will be larger than the supplied picture because of the added border.
The default image with a black 10-pixel border.
Task 4: Simple Pixel Transformations
Perform image manipulations that actually require manipulation of Pixel RGB values.
For this task, you will need to implement several basic pixel transformations from SimpleManipulations.java. These manipulations are simple in that they only require you to consider each pixel independently; you don't have to pre-process the image or consider neighboring pixels. As an example of this kind of transformation, we have given you an implementation of grayScaleLuminosity. You will implement the following transformations:
- Color Inversion: invertColors()
- Grayscaling Via Averaging: grayScaleAverage()
- Color Scaling: scaleColors()
|
| Color Inversion |
|
| GrayScale Average |

|
| Color scaling with (1.0, 0.5, 0.5) |
Color inversion takes each pixel and chooses the "opposite" color of the current one — that is, the one directly across the color wheel.
Grayscaling algorithms transform images from colorful ones to shades of gray; there are several methods of doing this, each of which works best in different situations. We have given you one algorithm and you will be implementing another. An explanation of the specific algorithms can be found in the relevant files.
Color scaling multiplies the color components of each pixel by given scaling values. For example, with the parameters (1.0, 0.5, 0.5), the red components will be unchanged, but the blue and green parameters will be converted to half their value. This has the effect of giving the picture a strong red tint and decreasing the overall brightness.
The transformations you will need to implement all require decomposing each pixel into its three color components: red, green, and blue. Take a look at the included Pixel class for help with this.
Task 5: alpha-Blend
Blend the pixels of another image into the current image.The next picture manipulation, alphaBlend() in SimpleManipulations.java, actually takes two pictures and combines them pixel-by-pixel to produce a new image. Both pictures must be of the same dimensions. This algorithm goes through the two pictures computing the weighted average of each of the corresponding pixels in the two images.

The default image blended (alpha = 0.5) with a gray scale (average) version of itself. This blend reduces the color saturation of the image by incorporating gray into each pixel.
Task 6: Advanced Pixel Transformations
For the next operations, work in AdvancedManipulations.java. Each of these transformations requires your to compute additional information about the image before they can be executed.
Contrast
Change the contrast of a picture by implementing the method contrast() in AdvancedManipulations.java.
Your job is to change the intensity of the colors in the picture, following this simple method of changing contrast:- Find the average color intensity of the picture.
- Sum the values of all the color components in all of the pixels.
- Divide the total by the number of pixels times 3 (the number of components). This is the average color intensity.
- Subtract the average color intensity from each color component of each pixel, resulting in a "normalized" color component. (This will make the average color intensity for the entire image zero.)
- Scale each normalized color component by multiplying them by the contrast "multiplier" parameter. Note that the multiplier is a double (a decimal value like 1.2 or 0.6) and normalized color values are integers.
- Add the original average color intensity back to the scaled,
normalized components to create a new pixel. Note that the
Pixel class will handle clipping of the resulting components to the range 0-255, as desired.
These scaled and normalized color components may be negative or larger than 255, but that is OK! (See below.)
The default image with contrast multiplier of 2.0.- Find the average color intensity of the picture.
-
Reduced color palette
Reduce a picture to its most common colors by implementing the method reducePalette().
You will need to make use of the ColorMap class to generate a map from Pixels of a certain color to the frequency with which identically-colored pixels appear in the image. Once you have generated your ColorMap, select your palette by retrieving the pixels whose color appears in the picture with the highest frequency. Then, change each pixel in the picture to one with the closest matching color from your palette. Use the distance method in the Pixel class to figure out the difference between two pixels.
Algorithms like this are widely used in image compression. GIFs in particular compress the palette to no more than 255 colors. The variant we have implemented here is a weak one, since it only counts color frequency by exact match. Advanced palette reduction algorithms (known as "indexing" algorithms) calculate color regions and distribute the palette over the regions. For example, if our picture had a lot of shades of blue and a little bit of red, our algorithm would likely choose a palette of all blue colors. An advanced algorithm would recognize that blues look similar and distribute the palette so that it would be possible to display red as well.
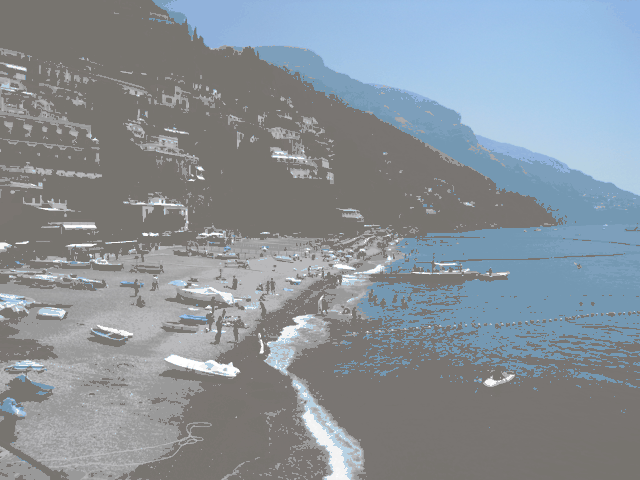
The default image with a palette reduced to 512 colors
Task 7: Blur
Make an image appear blurry or indistinct.
The blur() method in AdvancedManipulations.java takes one argument, a radius. There are different blurring algorithms; we'll implement the simplest, called a box blur. Box blurring works by averaging the box-shaped neighborhood around a pixel. The size of the box is configurable by setting the radius, half the length of a side of the box.
In the simplest case — a radius of 1 — blurring just takes the average around a pixel. Here, to blur around the pixel at (1,1) with radius 1, we take the average value of the pixels of its neighborhood: (0,0) though (2,2), including (1,1).
| (0,0)(0,1)(0,2)(0,3)... | (1,0)(1,1)(1,2)(1,3)... | (2,0)(2,1)(2,2)(2,3)... | ............... |
Each component should be averaged separately.
This algorithm must be careful of corner cases. When blurring (0,0) with radius 1, we only need to consider the top-left corner, (0,0) through (1,1) — we'll divide by 4 at the end, not 9. You'll have to be careful to only access bitmaps inside of their bounds. You can assume that you will not be given a radius less than 1.
The default image blurred with radius 2.
A Custom Effect (Kudos Problem I)
At this point you have implemented all of the basic transformations. The effects on the right-side of the GUI should all work, except for the last one. For this effect, you have the opportunity to design your own filter. Take a look at how the effects in Effects.java are implemented and do something cool in the method custom. This part of the assignment is worth no points, but we want to see what you come up with. If you create a particularly nice effect, post the output image (and the source code if you wish) to Piazza.
Flood fill (Kudos Problem II)
The last problem is a challenge problem. It is here for additional practice but again worth no points on the assignment.Finally, there is the flood command. The name is short for flood fill, which is the familiar "paint bucket" operation in graphics programs. In a paint program, the user clicks on a point in the image. Every neighboring, similarly colored point is then "flooded" with the color the user selected.
Suppose we want to flood color at (x,y). The simplest way to do flood fill is as follows.
- Let target be the color at (x,y).
- Create a set of points Q containing just the point (x,y).
- Take the first point p out of Q.
- Set the color at p to color.
- For each of p's non-diagonal neighbors—up, down, left, and right — check to see if they have the same color as target. If they do, add them to Q.
- If Q is empty, stop. Otherwise, go to 3.
Questions you should ask yourself (and not the TAs): what happens when target and color are the same? How can you speed up this naïve algorithm?
For Q, you should use the provided PointQueue class. It works very much like the queues we implemented in OCaml.
The default image after applying the operations blur(16), contrast(16), flood
Submission
Submit files.zip containing only:
- Pixel.java
- MyPixelTest.java
- SimpleManipulations.java
- AdvancedManipulations.java
- any new classes you created as support code (necessary only for Kudos code)
These files should be in the root of the zip file (there should be no extra folders or anything inside the zip that contains your files). Do not put PictureTest, or any of the other provided files in the zip file.
Grading
Here's the grade breakdown:- Pixel: 13 points
- PixelTest: 5 points, graded manually
- Simple image manipulations (rotateCCW, border): 10 points total
- Simple pixel transformations (color inversion, gray scale average, color scaling): 12 points total
- Alpha-Blend: 8 points total
- Contrast: 12 points total
- ReducePalette: 20 points total
- Blur: 20 points total
- Flood fill: 0 (kudos only)
We'll be testing functionality automatically, which has a maximum of 95 total points. You have five free submissions, after which there will be a five-point penalty for each extra submission. Because this is the first Java assignment, we will not be assigning style points. However, the TAs will read your code and give you feedback. As you complete the assignment, you should pay attention to the CIS 120 Java Coding Style Guidelines.