CIS 1951Spring 2024
CIS 1951 • Spring 2024
HW0: Environment Setup
Submit this assignment on Canvas.
Authors: Jerry Ye, Yuying Fan
Reviewers: Anthony Li, Jordan Hochman
Please leave feedback by posting on Ed or contacting the course staff.
Expected Duration: 10-15 minutes of engagement. 1+ hours of installing & updating software if required.
Deadline: Monday, 1/29 @ 11:59 PM
Objectives
- Learn some vocabulary.
- Ensure your Xcode is set up correctly.
- Make sure you can run apps using the virtual iPhone simulator.
- Meet the Playground — a “scratch pad“ to quickly experiment with Swift
Vocabs
- iPhone — a smartphone produced by Apple that runs the iOS operating system.
- iOS — the operating system that runs all iPhones and iPads. It’s responsible for downloading and running apps, making calls, taking photos, and pretty much everything else.
- Swift — Apple’s modern programming language. It is the language used to make apps for iOS, watchOS, MacOS, and all other Apple platforms. The language is relatively new, so new versions (with different syntax!) come out frequently. For this reason, you should search Swift 5 (the current version) whenever searching StackOverflow or Google.
- Swift 5 — the newest version of Swift, which we’ll use in this class.
- UIKit — Apple’s original user interface development kit, used on Apple platforms like iOS. UI development kits are how you interact on the code level with iOS. We won't focus on UIKit in this class, but we'll cover it briefly later in the semester.
- SwiftUI — Apple's new user interface toolkit. It uses a declarative syntax, allowing developers to describe UI elements and behavior succinctly. SwiftUI is known for its simplicity and efficiency compared to UIKit, with live preview features in Xcode. We’ll spend most of this class learning SwiftUI development.
- Xcode — an IDE (integrated development environment) provided by Apple. This is the iOS equivalent of Java’s Eclipse/IntelliJ editor. It allows you to write and compile Swift, and also provides a lot of niceties (autocompletion! type checking!).
- Xcode Simulator — a full iPhone simulator built into Xcode. We’ll use this to quickly test iOS apps without needing an actual iPhone (although if you have an iPhone, you can use that too!).
Install Xcode and Simulators
- Make sure you are running macOS Ventura 13.5 or higher. If you are not, update your OS first. This version is required for the version of Xcode we use.
- Make sure you have at least 30-40 GB free on the disk. This is the typical space taken up by Xcode with its dev dependencies.
- Go to the Mac App Store and install the latest version of Xcode available. If you have Xcode already, make sure it is at least updated to one of the version 15's.
- Launch Xcode and accept any permission dialogues. You may need to enter your computer password.
- When you are asked to "Select the platforms you would like to develop for," select "iOS". The others are optional for this class, and you can always download them later when needed. Again, make sure you have sufficient storage for the additional components.
Here is a video walk-through of the installation. It also covers topics including connecting your iPhone with Xcode and running apps from Xcode. App 0 only requires the steps listed above.
Note: If you run into any issues throughout the installation step, make sure you've updated your OS and have enough storage available to download XCode. The installation takes a long time, so let it sit for at least a few hours before asking for help.
If you made it this far, your environment should be set up for the semester. Next, we’ll get started with Xcode playgrounds.
Xcode Playgrounds
“Playground - noun: a place where people can play”
Playgrounds are miniature testing environments for the Swift language. They allow you to quickly try out code and see results — without making a full app! Some of our tutorials will use Playgrounds.
Do the following:
- Make a new folder for this course. Make sub-folders named
tutorialsandapps. - Launch Xcode.
- Click on File > New > Playground.
- Pick "iOS" and "Blank" for the template.
- Name the new playground
app0_lastname_firstnameand save it in your newappsfolder.
Great! You should now see a Playgrounds file with some boilerplate code:
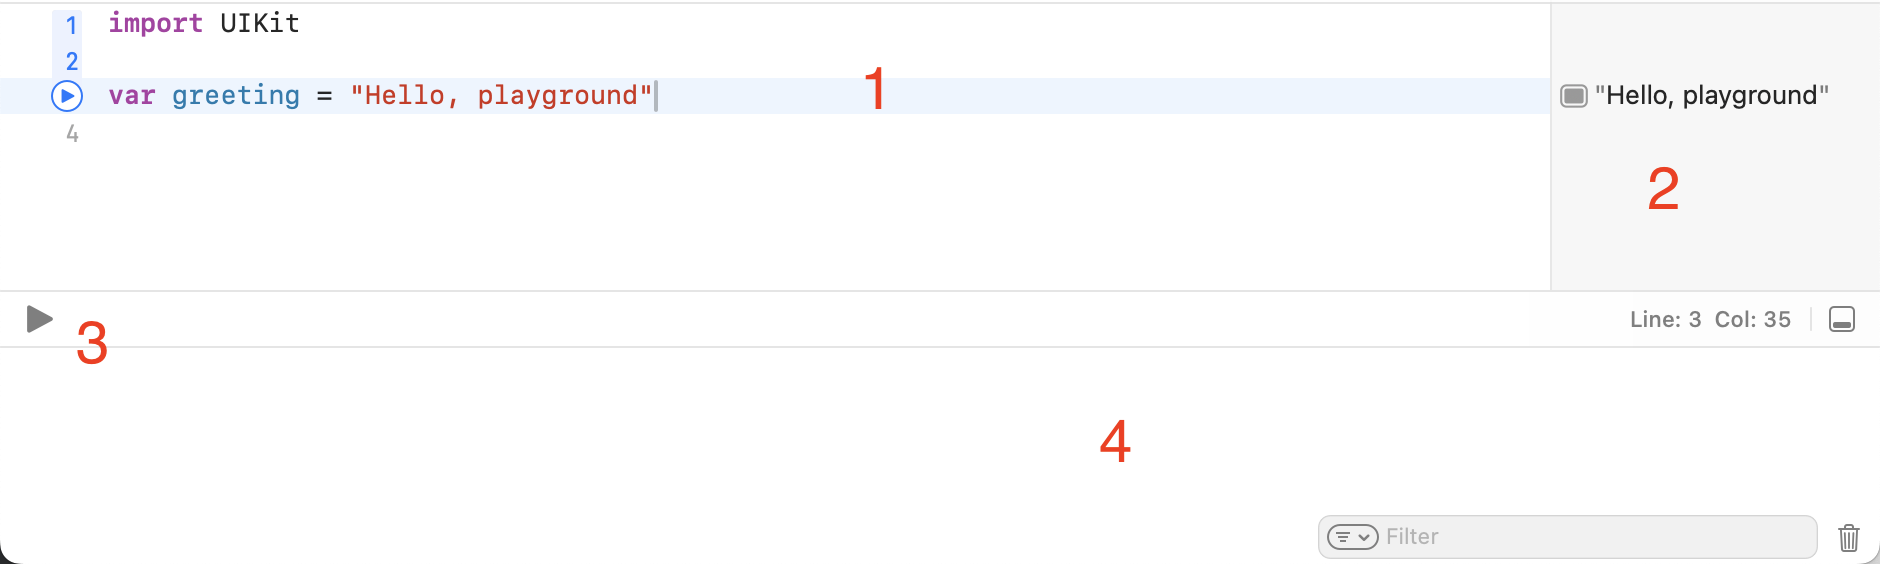
- This is the code editor. Code goes here!
- This is a “status panel” — a feature unique to Playgrounds. When you initialize a variable, it will show you the value of that variable. This will also show you useful debugging info, like how many times each line of code is run. This is a feature of Playgrounds that we won't have when developing full apps.
- This is the play button to compile and run code.
- This is the output console — errors and print statements are sent here.
Do the following:
- Erase the line beginning with
var greeting = "Hello... - Write a comment:
// App 0 - Make constants for your name, penn id (number), and favorite emoji (replace the <...>):
let name = "<YOUR NAME>"
let pennId = <PENNID>
let emoji = "<YOUR EMOJI>"
- Add a line to print out your constants:
print("Hello World! My name is \(name) and my pennId is \(pennId) \(emoji)")
- Click the play button to compile and run.
Congrats! You just ran your first line of Swift 🎉🎉🎉
DON’T FORGET: Submit app0_lastname_firstname.playground on Canvas by Monday, 1/29 @11:59 PM.