Part 1. Docker Setup
The setup steps require using the command-line interface (CLI) from your host operating system. You will be using a CLI very frequently as part of your work in this class, so we recommend finding a setup that you are comfortable with. Commands are entered into a “Terminal” application. Examples of such applications for Mac include Terminal and iTerm2. Examples for Windows include PowerShell and Windows Terminal (please do not use the Windows Command Prompt (CMD) when executing commands for this course).
Another options for those using windows is Windows Subsystem for Linux (WSL). Links for setting it up can be found here: WSL Install. Here is another link that can be useful for further setting up your envinronment: Setting up a WSL Development Enviornment.
Step 1. Install Docker
If you have Docker environment (Docker Engine or Docker Desktop) installed on your computer already, you can skip this step.
Follow Get Docker | Docker Documentation to install Docker Desktop on your operating system. Make sure to follow the one with your corresponding operating system and architecture. The instructions would often include multiple ways to install Docker Desktop on your computer, following one of them is enough.
If you use a Linux distribution that is not supported by Docker Desktop (an unsupported architecture or without a desktop environment), you can follow Install Docker Engine | Docker Documentation to install Docker Engine on your computer.
Once the installation is finished, start Docker Desktop and accept the terms. You should see an interface similar to this:
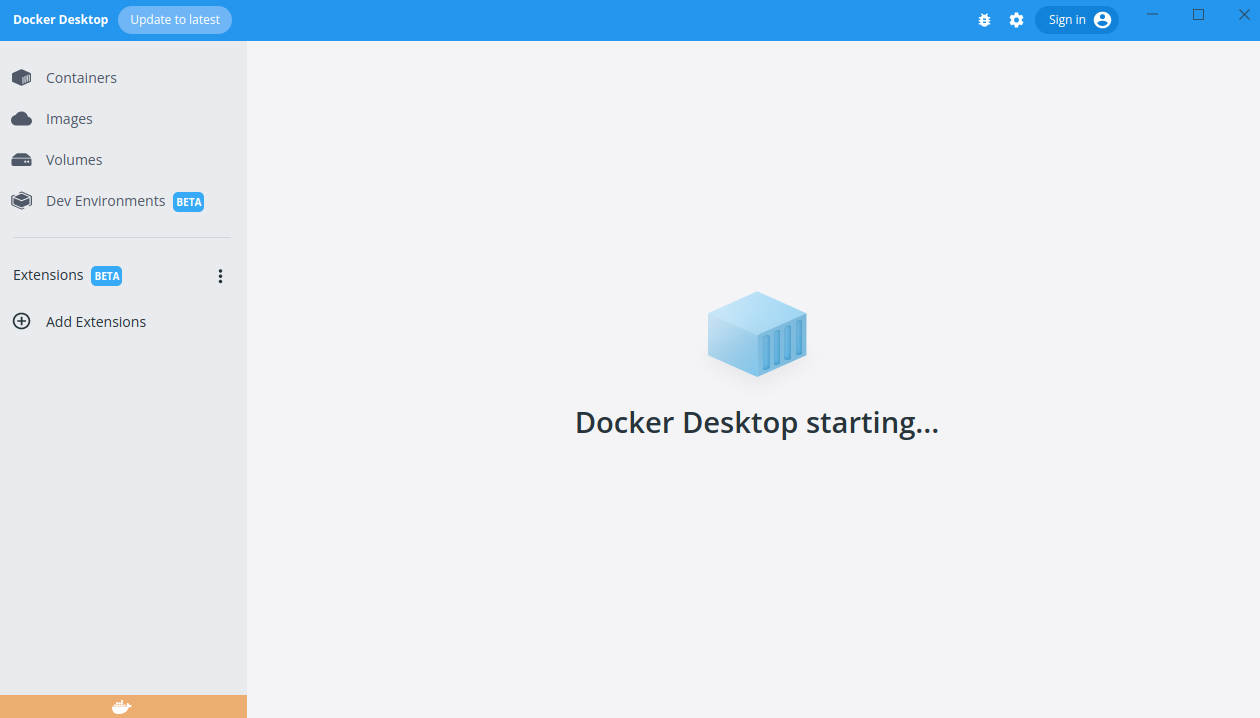
Give it some time and wait until this message goes away. Your Docker Desktop should now be running if you are greeted with the tutorial page and no error messages come up.
You should skip the tutorial provided by Docker Desktop.
Step 2. Create a Docker Container
You only need to set this up once.
Open a new terminal window. By default it should start under your current user’s directory. You can use the pwd command to print your terminal’s current path:
pwd
To see all of the files and directories within the current working directory, you can use the ls command:
ls
If you don’t want to store your project files under the current working directory, you can use the cd command to “change directory” in your terminal. For example, you can navigate to the Documents directory (if it already exists, relative to your current working directory) with the following command:
cd Documents
If you need to make a new directory, you can do so using the mkdir command. For example, you can make a directory named workspace in the current working directory as follows:
mkdir jammy
Then you can change to the newly created directory using cd:
cd jammy
Using pwd, note where your created directory is, which may come in handy in the future.
Now execute the following command, given that the current working directory is the one created above:
docker run -td -v "${PWD}:/root/workspace" --name jammy-container tqmcgaha/docker-env:jammy-g12c15
This command line will pull (download) tqmcgaha/docker-env:jammy-g12c15 Docker Image onto your computer, and then create a new Docker Container named jammy-container using that Image. The path /root/workspace inside the container is mapped to the current working directory of your host system (${PWD}).
If you want to know more about the meaning of these command line arguments, please refer to docker run or Docker Documentation.
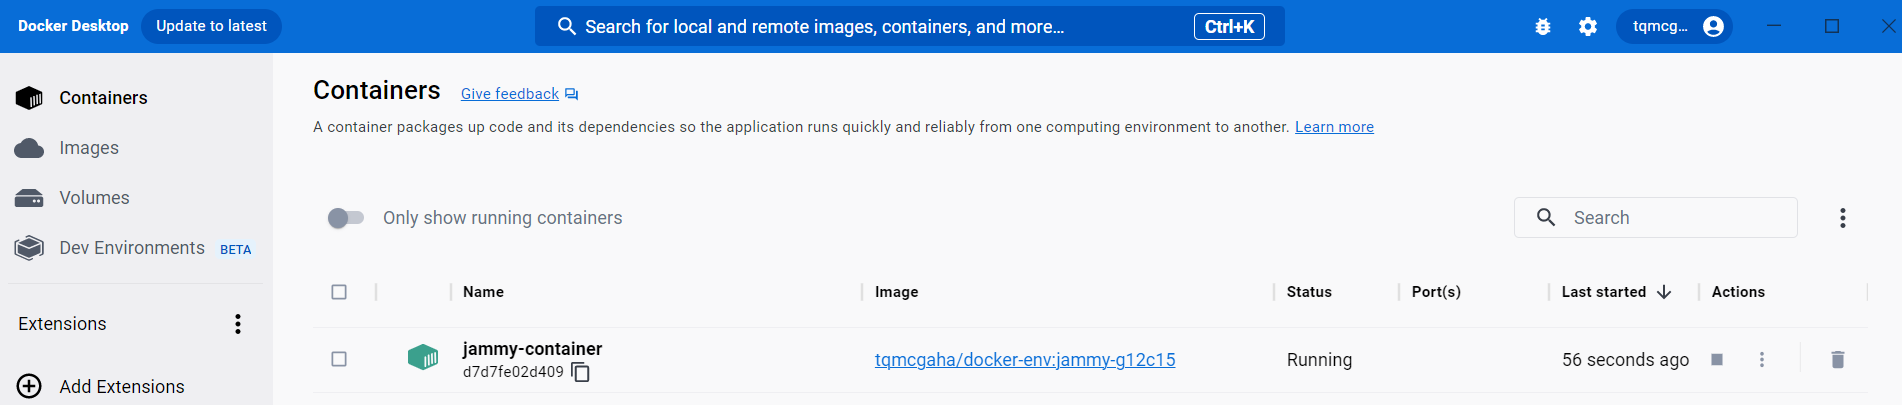
Now you should have the container jammy-container created and running. You should be able to see this container in Docker Desktop’s Containers tab, or using docker ps command.
Step 3. Use the Docker Container
After you finished Step 2, you can now execute this command to spawn and attach to a shell inside the Docker Container:
docker exec -it jammy-container bash
If you want to know more about the meaning of these command line arguments, please refer to docker exec or Docker Documentation.
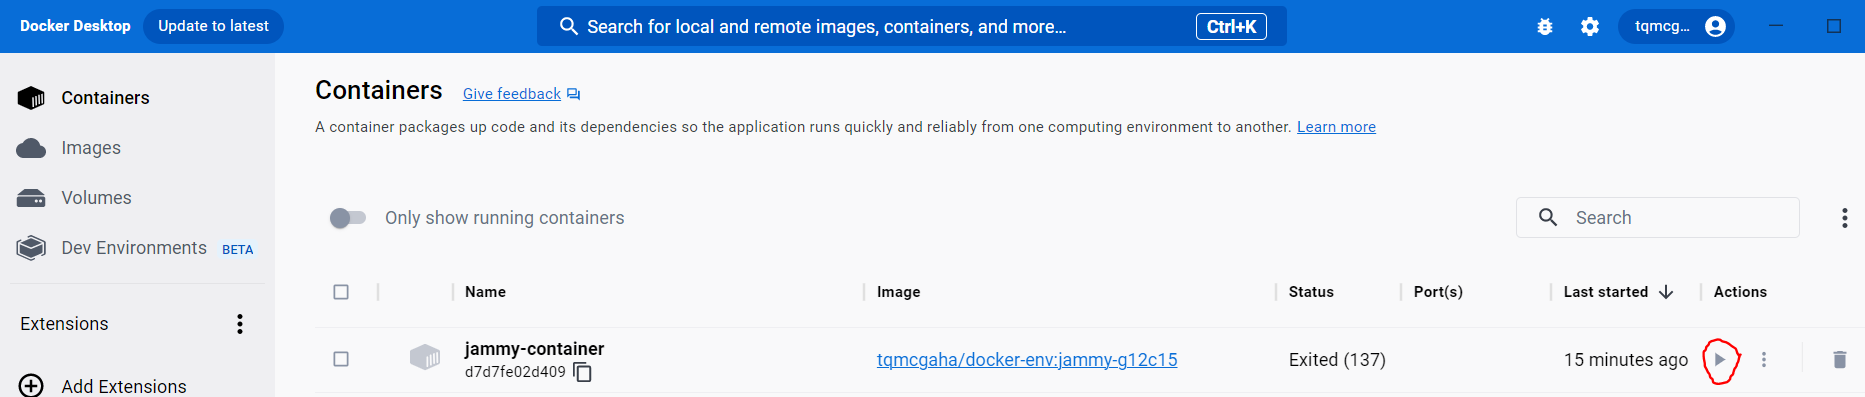
If you see the following error, maybe after a computer reboot:
Error response from daemon: Container [...] is not running
Then click the start button for the container in Docker Desktop, or use docker start jammy-container to start the container.
When you execute any commands related to this class from now on, make sure to execute them inside the Docker Container. One way to distinguish between if you are inside the Docker is to pay attention to the prompt text: if you are in the Docker Container, the prompt should be something similar to
root:workspace/ #
Another way, for example, is to execute docker command. If you are outside Docker (on your host OS), docker command should output a list of help texts; If you are inside Docker, executing docker command should give you docker: command not found error.
Part 2: Choose a text editor
Prelude
To test that you have setup the container correctly and see how the text editors interact with them, lets download some sample files first.
Run the following commands in the docker container to download the files:
curl -o check_setup.zip https://www.seas.upenn.edu/~cis2400/current/code/check_setup.zip
unzip check_setup.zip
cd check_setup
You are welcome to use any text editor or Integrated Development Environment (IDE) for projects in this course. Here, we provide two recommended ways to edit your files.
Visual Studio Code
Step 1. Install containers extension
If you are using VS code, you can close the terminal instance interfacing with docker (but not docker desktop! leave that running) that we opened earlier with docker exec -it jammy-container bash.
You should just type the command exit in the terminal to exit it. VSCode has its own terminal that runs inside of VS code to interface with docker.
If you haven’t already, you need to first install Visual Studio Code on your host computer.
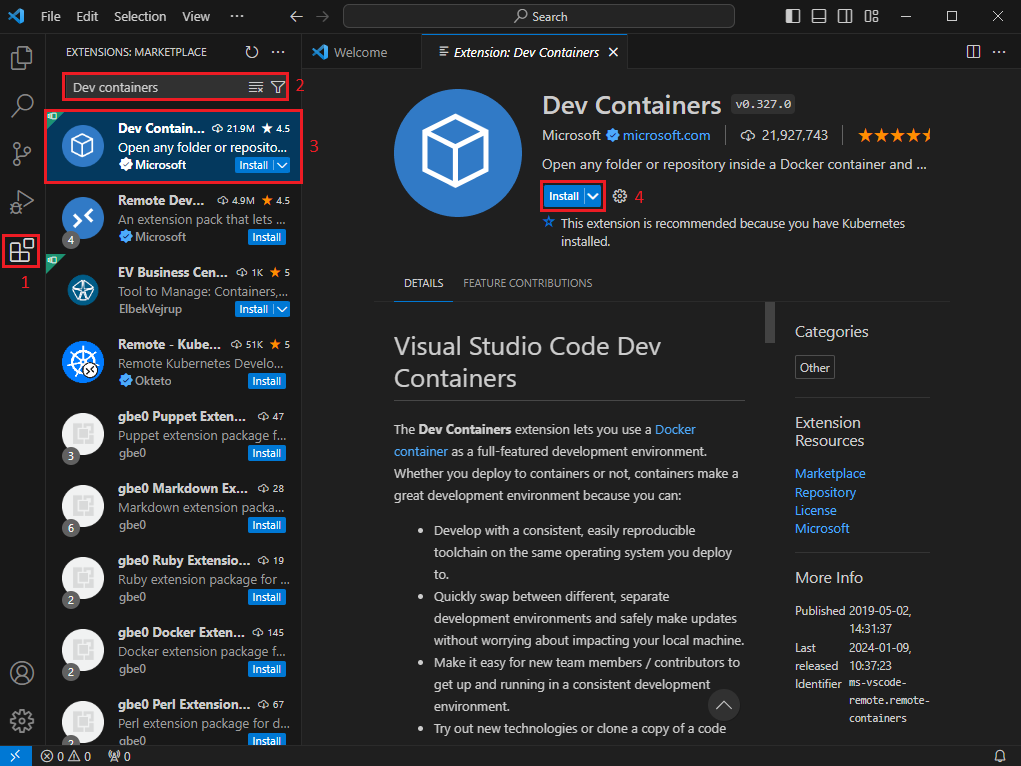
Start a new VSCode window, and follow these steps to install the Dev Containers plugin:
- Click into Extensions tab on the left vertical bar of your VSCode window. It is usually the fifth from the top down.
- In the search bar, type in “Dev containers”.
- Usually the first option that came up is the one we want, click into it.
- Make sure it is the extension Dev Containers we are looking for. Click the Install button.
Step 2. Attach to the running container
After installation, you should see a small (blue or green) button in the bottom-left corner of the window. Click it and in the new pop-up window, click Attach to Running Container…
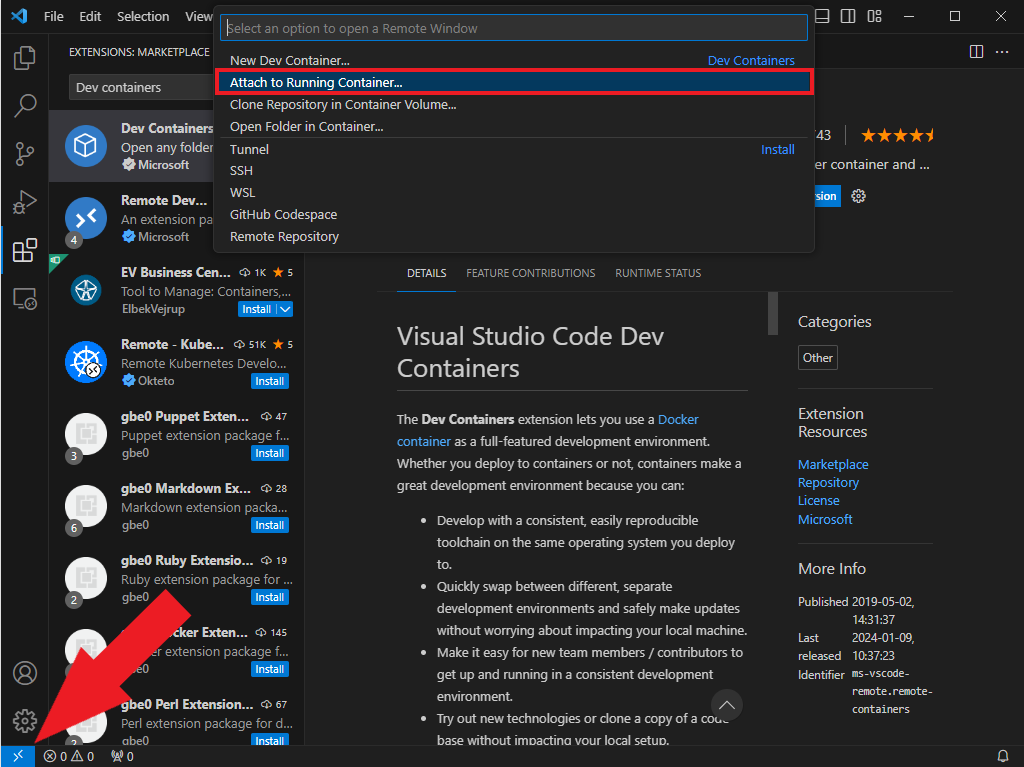
Select the one with the name /jammy-container, or use the search bar if you have too many containers:

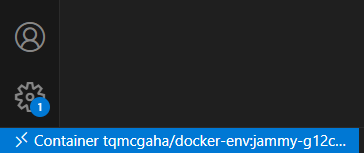
If you don’t see jammy-container here, make sure the Container is up and running.
After selecting the jammy-container container, a new window should pop up. The bottom-left corner should display something similar to this:
Step 3. Open project directory
On the top toolbar, click on File and select Open Folder…, and a new pop-up window should appear:
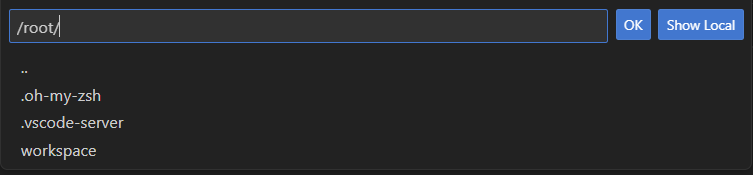
Here you can browse the Container’s filesystem.
Click into workspace folder then click on the OK button. VSCode will then reload and use the folder you just chose as the working directory.
Again on the top toolbar, click on Terminal and select New Terminal, a terminal section will appear at the bottom of the window. You should see a layout similar to this:
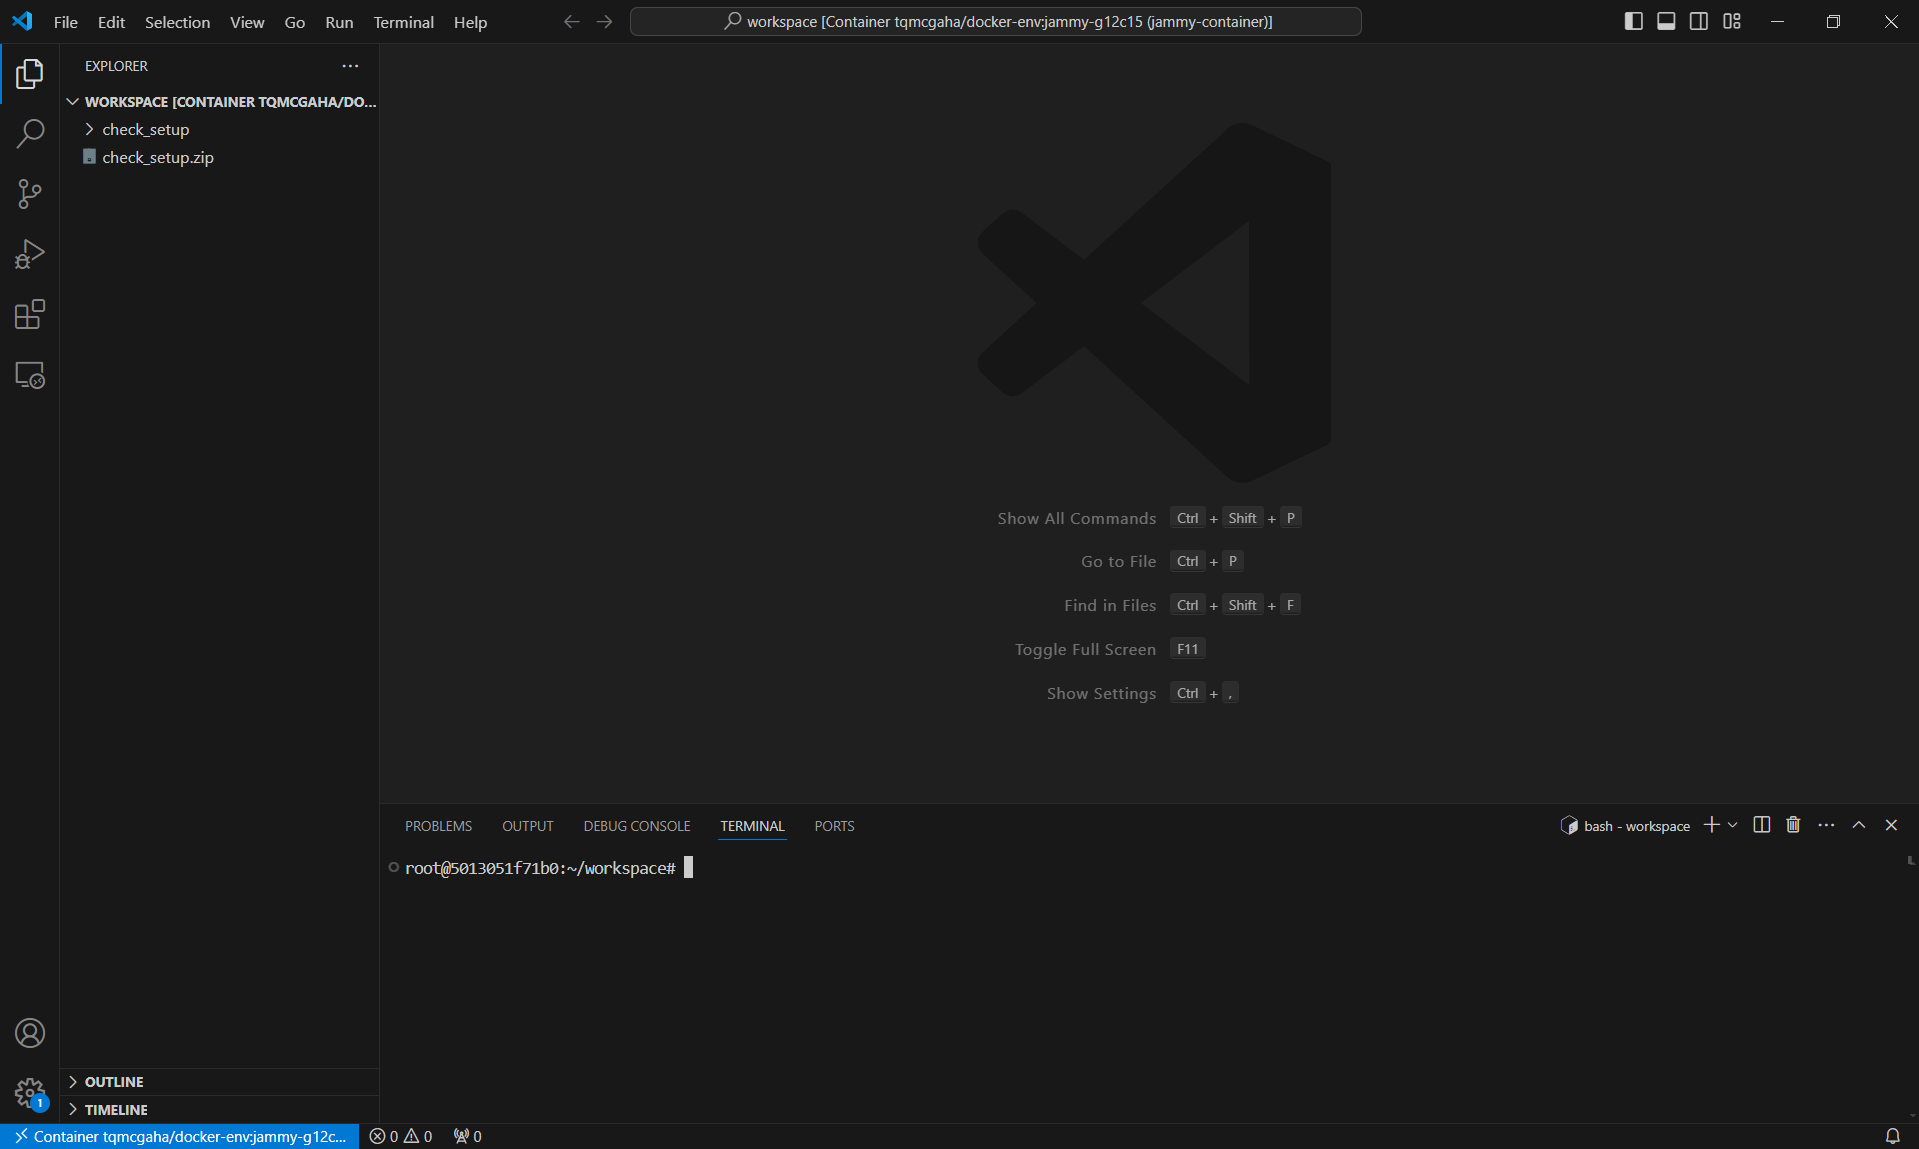
On the left, the Explorer section shows all the files under this directory.
On the bottom, the Terminal section is a shell for you to execute commands inside the Docker Container;
The main section is the file editor. Any file you chose in the Explorer section is opened and displayed here.
Let’s try running the code we downloaded in check_setup to make sure it works
In the exlporer section on the left click on check_setup to expand it and see the files in it. You should be able to see the file hello.c. You can see that it just prints things out but it also prints out a secret message you will need for the first check-in. To see the message you will have to run the code, to do that we first need to compile it.
In the terminal type cd check_setup to move the terminal’s current directory from workspace to workspace/check_setup.
Once you have done this, you can try running the command make which should compile hello.c into a program called hello. Try running the program by doing ./hello in the terminal and you should be able to see the message it prints!
To learn more about the usage of Visual Studio Code, you can refer to available resources online, such as this one: Getting started with Visual Studio Code.
Vim Editor
Vim editor is a screen-based text editor that is already installed in your Docker Container. Inside your Container, you can run the editor by executing vim in the Container’s shell. If you include the path/name of a file after vim, it will either open the existing file, or create a new blank file (if no file exists at that path).
Vim is one of the oldest and influential editors to have existed. Even if people don’t use vim, a lot of people use vim shortcuts and keybindings in other editors (it is a very commonly supported feature!)
Travis McGaha actually uses it as his editor of preference. One other reason for that is vim works for every language on almost any platform. It is also much more lightweight (less resource-intensive) than other editors like VS Code.
Lets get started with vim. You will need the same terminal that you started before with docker exec -it jammy-container bash. If you closed that terminal, re-open it.
Once we are in there, you can type the command ls and you should see something like this:
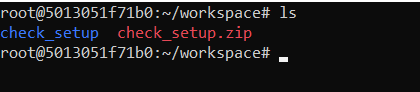
We can see that we have the check_setup directory from earlier and the zip file we used to get it.
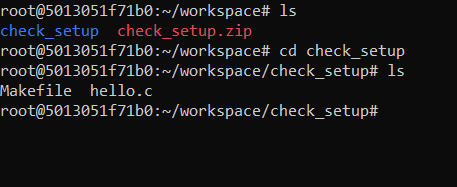
Lets now run the cd command and then run the ls command after that. If we do that will move us to be inside of the check_setup directory and show us everything in it.
It should now look something like this:
Lets try using the vim command now. Try running:
vim ./hello.c
When you do this for the first time it will install a bunch of things. Once it is done try typing :q then hitting enter.
You should not see this subsequent times you use vim.
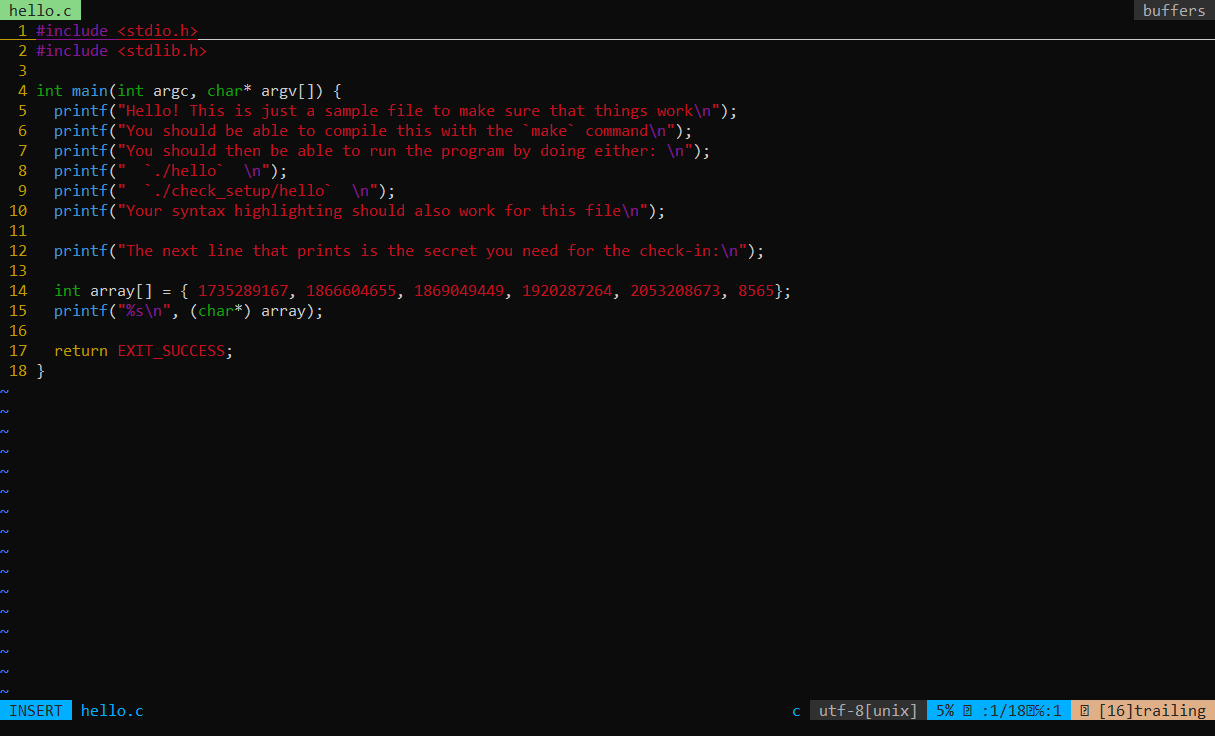
You should now be able to see the file hello.c and it should look something like this:
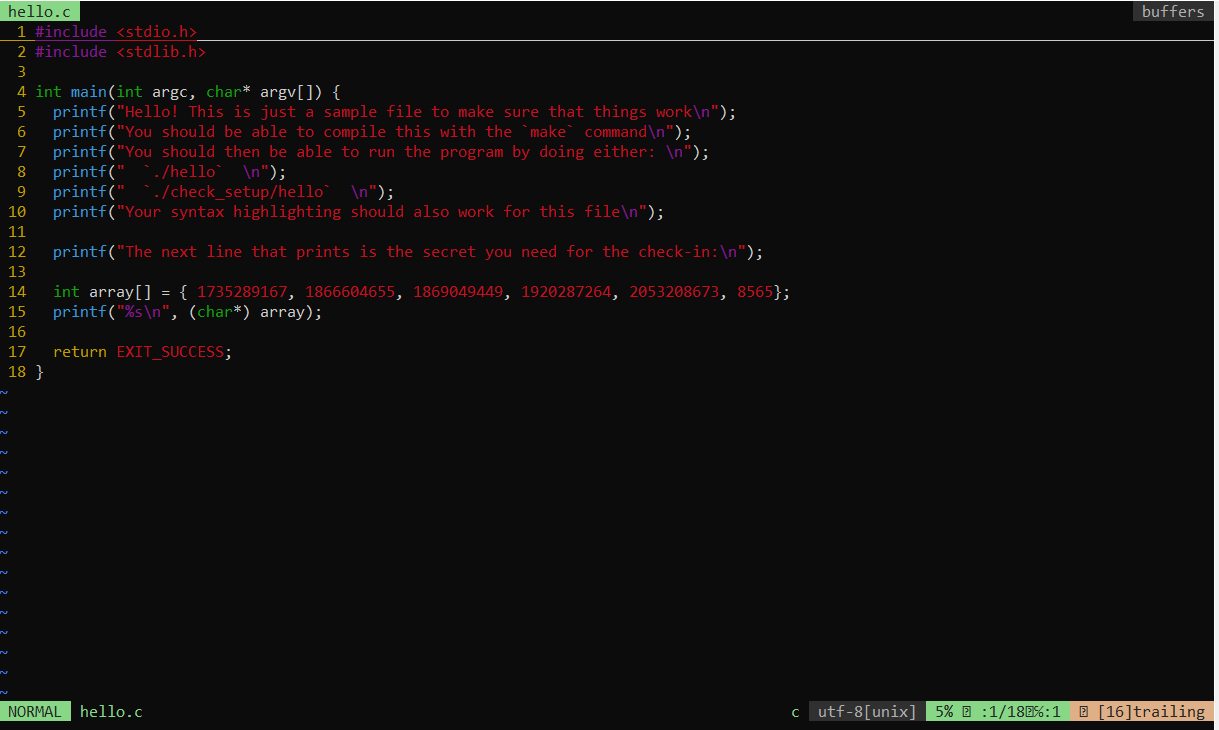
An important concept to vim is that there are different “modes” to vim. With our configuration, you should be able to see what mode you are in by looking in the lower left corner. Notice how in the screenshot above it says NORMAL. You should start off in Normal Mode which is the mode where you are able to scroll through the file using arrow keys (or the h, j, k, l keys) and enter other modes.
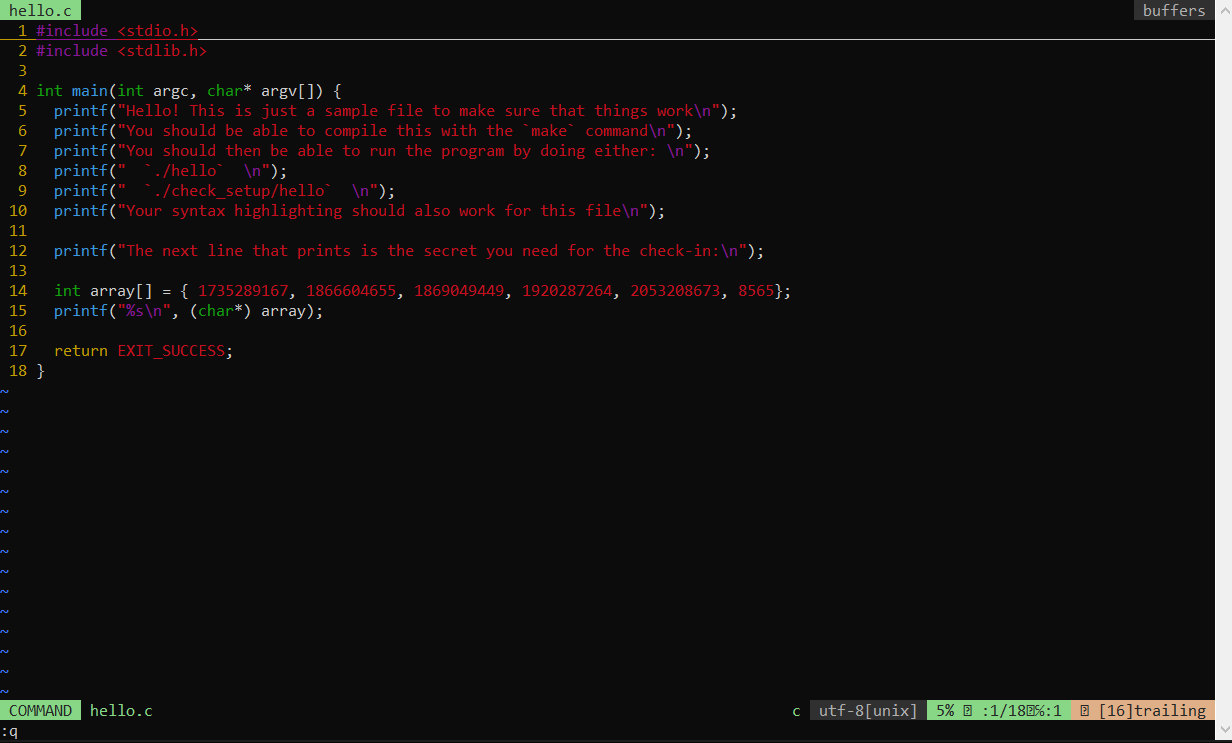
From normal mode we can hit : to start tpying in a command and enter COMMAND mode. The most important command to learn first is how to exit vim. It is commonly joked that exiting vim is hard, but it really isn’t. The command for it is :q, just hit enter afterwards. Below is a picture of what it should look like just before you hit the enter key. Note that it says COMMAND in the lower left and just below that it shows the command we are typing (:q).
There are also other variations on exiting/saving:
-
:q!exits without saving -
:wqsaves and exits -
:wjust saves, but does not exit
If you hit the enter key to run the :q command, reopen hello.c with vim to continue our walkthrough.
The other useful mode to know about for now is Insert Mode this is how you actually modify text with vim. Press i to enter insert mode. From there it should look like this
notice again how the lower left changes to be in INSERT mode. You can now navigate to the end of line 4 or beginning of line 5 and hit enter. This should insert a blank line where you can now add your own print statement. Try adding the line printf("Vim is the best!\n");. Note: if you are trying to copy and paste in the terminal you typcially need to just right click to paste (or if you have text selected it will instead copy). It should look like this:
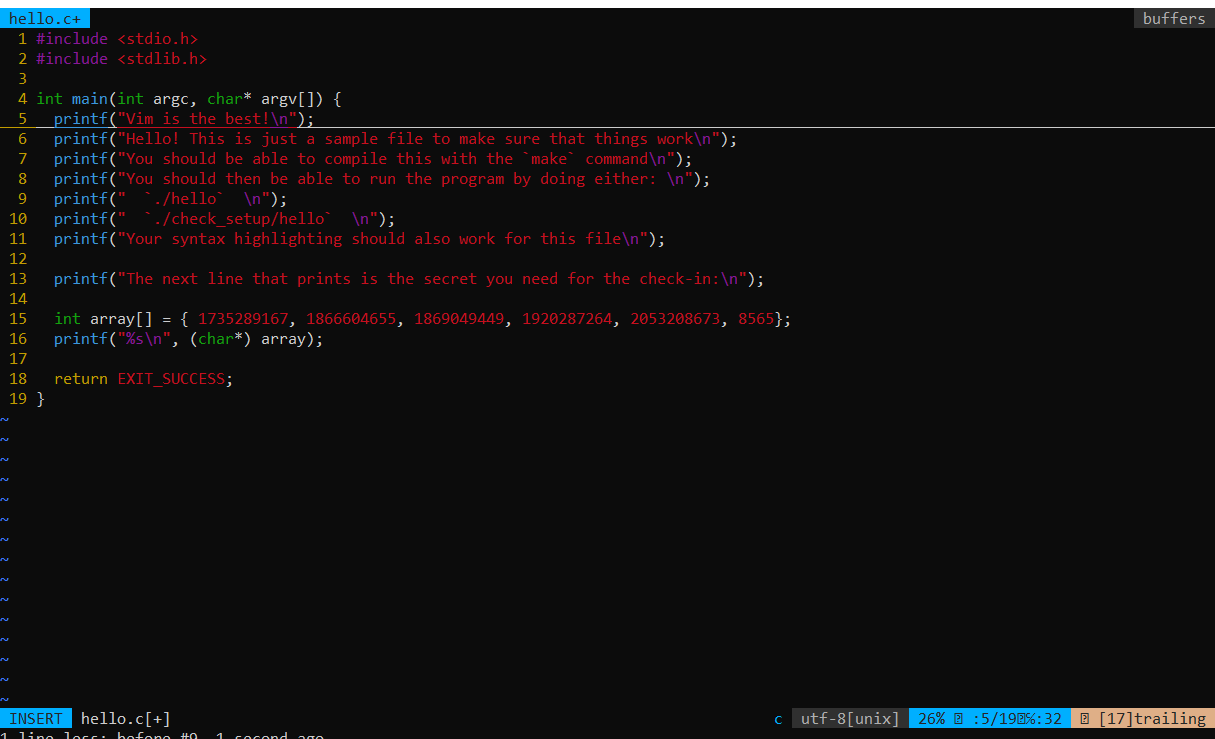
We should now save and exit. We can hit the escape key to go back into NORMAL mode and then :wq to save and exit.
Once you have done this, you can try running the command make which should compile hello.c into a program called hello. Try running the program by doing ./hello in the terminal and you should be able to see the message it prints!
Another thing that is worh noting is that if you need help in vim, you can have it show the vim help manual by using the :help command from NORMAL mode.
This was just some basics of using vim, but its true power comes from all the other things you can do with it. To avoid overwhelming you, we recommend just starting with these commands and leanring more as you need them or want to learn more.
For a vim tutorial, run vimtutor in your container Shell. There are also many great tutorials for Vim, We encourage you to check them out!
Here is another tutorial that Travis found and thinks is pretty good. It is short and to the point: https://www.makeuseof.com/how-to-use-vim/
Part 5. FAQ’s
Q1. I am encountering an “possibly corrupted debugging file” error when using Valgirnd, how can I fix this?
A: execute the following command in your Docker Container:
apt update -y && apt autoremove -y --purge clang clang-format && apt install clang-15 clang-format-15 -y --no-install-recommends && update-alternatives --install /usr/bin/clang clang /usr/bin/clang-13 100 && update-alternatives --install /usr/bin/clang-format clang-format /usr/bin/clang-format-15 100
Afterwards, recompile your program using make -B. You only have to do this once.
Q2. I am running into an “docker: invalid reference format.” error when running
docker run -td -v "${PWD}":/root/workspace --name jammy-container tqmcgaha/docker-env:latest
how can I fix this?
A: Run the following command
docker run -td -v "${PWD}:/root/workspace" --name jammy-container tqmcgaha/docker-env:latest