Updated on 10/7/2014
Note:
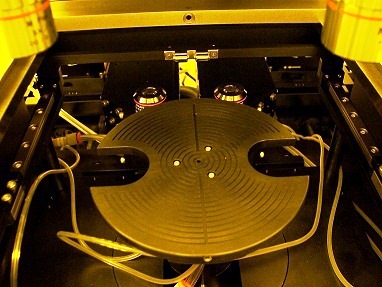
Wafer chuck bottom
Wafer chuck top
CAUTION! FAILURE TO PLACE WAFER STAGES IN THEIR INITIAL POSITIONS MIGHT RESULT IN DAMAGE TO YOUR MACHINE OR SAMPLES
1 Log in
2 Load the mask
3 Capture an image of the alignment mark of the mask
4 Load a wafer with the alignment marks on its backside
5 UV lamp warm up
6 Mask alignment
7 Exposure
8 Unload the mask
9 Unload the wafer
10 Shut down
1. Click on the NX2600 icon on the PC.
2. Enter user name and password in the login menu.
3. Nanonex NX2600 alignment window shows up with the viewing window of the microscope images.
4. Turn on the light power for the microscope.
5. Click the "Exposure Time" button on the right side of the alignment window
6. Click "OK".
7. Click "Home" on the lower left of the alignment window.
8. Working Mode dialog box pops up.
9. Check "Backside Align" and Enter the exposure time.
10. Click "Apply and Close" button.
11. Wait until the system is ready.
1. When the system is ready, the following alignment window is shown.
2. Place your mask on the mask holder (face up), and lock the mask using the spring lock located on the mask holder if you are using a square shaped mask.
3. Click "Mask Vacuum off" button to turn on the mask vacuum. Control buttons display the following.
4. Click "Next->".
5. The dialog box pops up, asking for inserting the mask to the mask holder.
6. Flip mask holder and slide onto the aligner.
7. Click "OK" in the "insert mask holder" dialog box.
8. Control buttons display the following:
9. Click "Mask Holder Unlock". Control button shows the following:
10. Click "Next->".
1. The following dialog box shows up.
2. Click "OK".
3. Click "Back Side Video" in Control buttons.
4. Backside operation dialog box shows up.
5. Inputting the following default values in the blank box under the "Home xx" buttons in the dialog box.
6. Click "Move XX" buttons to move the bottom microscopes 1 and 2 under the windows of the wafer chuck in the following sequence.
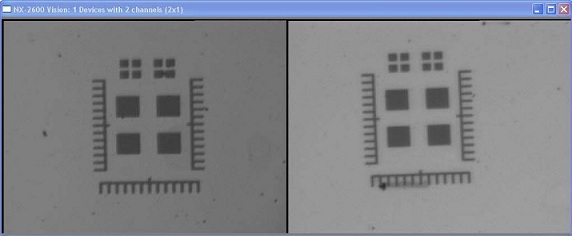
7. Make sure that the CCD monitor shows the alignment marks of the mask.

8. Focus the alignment marks by moving Z1 and Z1 coordinates.
9. Move X1, X2, Y1, and Y2 for fine adjustment of the location of the alignment marks in the CCD images, as well.
10. You may also change the magnification of the microscopes by click "High Mag" or "Low Mag" button. The default setting is "Low Mag".
11. Click the "Capture Image and Continue" button on the lower right side of the dialog box.
12. The following dialog box shows up. Click "OK".
13. The following dialog box shows up. Click "OK".
14. Program will capture the current alignment marks on the mask and display on the screen.
1. The following dialog box shows up.
2. Pull out the drawer, and place the substrate on the wafer chuck, aligning wafer edge to the marks on the wafer chuck. Click "OK".
3. Click "Wafer Vacuum Off" button to turn on wafer vacuum.
4. Click "Next ->" button to continue
5. The following dialog box shows up.
5. Insert the drawer all the way into the machine. Click "OK" to continue.
1. The dialog box pops up, asking for turning on UV lamp.
2. Click "OK". Wait until UV lamp is ready.
3. When UV lamp is ready, the dialog box pops up, asking you to move the microscope to the up position.
4. Make sure that the microscope is at the "up" position.
5. Click "OK".
6. The dialog box pops up, confirming that microscope is moved.
7. Click "OK".
1. The computer will level the wafer to the mask automatically, and then bring the wafer close to the mask.
2. Plug the illumination fiber labeled "Front Side" into the fiber light source. The user interface is showing the front side microscope images now.
3. Adjust microscopes to focus on the mask.
4. When the leveling of the wafer is done, the dialog box shows up for adjustment of z position of the wafer.
5. Adjust Z position by the "UP 10 um" or "DOWN 10 um" button, so that your mask and wafer is close enough for alignment, yet not too close so they move together.
6. Switch the illumination fiber to “Backside” again.
7. Click "OK" in the dialog box.
8. The screen will show images of alignment marks on the bottom side of the wafer, on the captured images of the alignment marks of the mask.
9. The following dialog box shows up.
10. Click "OK". Backside Operation menu will show up again.
11. Move the Z1 and Z2 locations of the bottom microscopes only (don’t change X1, X2, Y1, Y2 positions) to focus on the images of the wafer, using the "Move Z1" and "Move Z2" buttons.
12. You can adjust the gap between the mask and wafer by clicking the "Main Z UP" or "Main Z Down" button on the middle right side.
13. Align the wafer with the mask, using the x-, y- and Theta (rotation) knobs.
14. After the alignment, You can make a contact between the wafer and mask again by clicking the "Main Z UP" button. Force would be ~7.
7. Click the "Close and Continue" button on the right side of the dialog box.
1. The dialog box shows up, asking you to move the microscope to the up position, so that the UV exposure lamp can be moved in for exposure.
2. Make sure that the microscope is at the up position.
3. Click "OK".
4. The dialog box shows up, asking you to move the microscope to the up position again.

5. Click "OK".
6. UV lamp will move in, exposure, and then move back to home position. Please wait.
1. The process will finish automatically. Then the mask holder will be unlocked.
2. A pop up menu will remind you to remove the mask holder and insert it into the seating facing up.
3. After place the mask holder in a right position, click "OK".
4. A pop up menu will ask you if you want to turn off the mask vacuum.
5. Click "OK" to unload the mask.
1. A pop up menu will ask you if you want to turn off the wafer vacuum.
2. Click "OK" to unload the wafer.
1. The system status shows the end of the process.
2. Click the "Home" button on the lower left of the alignment window.
3. Working Mode dialog box pops up.
4. Check "Backside Align".
5. Click "Apply and Close" button.
6. Wait until the system is ready, so that the bottom microscopes are put back to the "Home" position.
7. Click the "Shut Down" button after confirming the bottom microscopes in the home position.
8. A pop up menu will ask you if you want to shut down.
9. Click "Yes".
10. Turn off the light power of the microscope.
11. Plug the illumination fiber labeled "Front Side" into the fiber light source.
12. Remember to manually adjust the X, Y and Theta stages to their initial positions.